Thursday, August 10, 2017

Lilla Rose has such a beautiful selection of hair pins (called U Pins). This is a new set I just bought called Iris. I love that they are large enough that you can really see them well in an updo. Please check out my Lilla Rose page to find out more! www.lillarose.biz/livinglifescentsibly

Saturday, July 1, 2017

DIY Skin Care Products

It has been such a long time since I last blogged. I thought I would start it again, since I have missed it. I have been going through a major DIY kick lately. It seems that even the stuff I buy at the health food store that is labeled organic or all natural is actually still loaded with chemicals. I checked out the EWG Skin Deep website, and was shocked that several of my body lotions that were supposed to be healthy and natural were ranked just as bad as the store bought stuff. I decided to try making a lot of my skin care products. I just recently made some homemade cold cream, and today I made some body butter. I found the recipe online. It turned out really well! I'm happy with it so far. 

I used Young Living geranium and lavender, which are both really good for skin. Both are anti aging, and have many healing properties. 

Monday, December 23, 2013

Candy Cane Kisses

As Christmas is almost upon us, I am trying to create as many healthy goodies as I can. My newest creation is Candy Cane Kisses. These are just SO yummy! I was so happy that they turned out great the first try. Love when that happens :)! They are very addictive, so make sure you make a lot. They are crispy, not chewy, and are hard to describe what they compare to. They are like small, melt-in-your-mouth crispy cookies. That is all I can describe them as!

Here is the recipe:

4 egg whites, room temperature
1/4 tsp. salt
1/4 tsp. cream of tartar
1/4 cup honey
1/2 tsp. liquid stevia (I used NOW stevia glycerite)
1 tsp. vanilla extract
1 or 2 peppermint crushed candy canes (I only used 1. I used these, which I got at our local co-op. They are corn syrup free, dye free and organic)

In a mixing bowl, beat egg whites until foamy. Add the salt and cream of tartar, and while beating, slowly drizzle in the honey, stevia and vanilla. Beat until stiff and glossy (about 10 minutes). Spoon the meringue mix into a re-sealable plastic bag (you can also use a pastry bag). Cut a small hole in the corner of the re-sealable bag. Squeeze small kisses (I did about 1 1/2 inch sizes) onto parchment or Silpat lined baking sheets. Sprinkle the kisses with the crushed candy canes. Bake at 225 degrees for 1 1/2 hours. If they start getting too browned, turn the heat down farther. They will still be soft after cooking. Turn oven off, and allow the kisses to cool in the oven for at least an hour. After cooled and hardened, remove them from the baking sheets and store in an airtight container.

This recipe made a little over 100 kisses. I made them last night, and they are already halfway gone, so I need to make more before Christmas.

Wednesday, December 18, 2013

Flexi's for sale


I have 5 December Flexi of the Months available for sale, if anyone is interested. They are sold out on the website. If you would like it before Christmas, there may be enough time to do that if you get one quick enough. I am going to give a discount price also on each Flexi. The sizes I have, with the prices (minus shipping) are:

1 Extra Small - $15 (normally $16)
2 Small - $16 each (normally $17)
 1 Medium - $19 (normally $20)
1 Large - $20 (normally $21)

Monday, November 25, 2013

December FOTM


Lilla Rose released the December FOTM a bit early, so that people could get it before Christmas. It is beautiful!! Supplies are very limited, so get them while you can! I purchased extra ones, so if they run out, you can contact me if you are interested in purchasing one.

Friday, November 1, 2013

November Flexi of the Month

The November Flexi of the Month is now available for purchase! For information, please visit my Lilla Rose page here !


Tuesday, October 8, 2013

Mug cake

I had written before about the fact that my daughter showed up as positive to being allergic to eggs. We went egg free for awhile, but didn't see any changes positively or negatively. We consulted with our doctor, who recommended we try eggs again and see what happens. So far everything has been fine, so I am really thankful for that! I really feel for those of you who have egg allergies. It makes baking so much harder!

I have been trying to perfect a mug cake that my daughter will eat. I make a chocolate one for my hubby, and he loves it. My daughter isn't a huge chocolate fan. I made this the other day, and my daughter said it tasted like a cross between cake and a muffin. It was a hit! Yay! It is very easy, and quick to make. If you have trouble with the nut flour/butter, you can try substituting with another gluten free flour and omitting the nut butter (add an extra tablespoon of gluten free flour). You may need to add a bit of milk if you substitute the flour.

1 Tablespoon ghee
1 Tablespoon nut butter (I used almond butter)
2 Tablespoons almond flour
1/2 tsp. baking powder
1 egg
Stevia or honey to taste (I taste the batter before I put it in the microwave to cook)
1/2 tsp. (or more) vanilla extract

Melt the ghee and nut butter in a coffee mug in the microwave. Add the remaining ingredients and stir very well (this is important because otherwise you will have chunks of cooked egg in your cake). Taste to see if it is sweet enough. Place the mug in the microwave and cook for 1 minute 15 seconds (or longer if your microwave is not very powerful). The cake will rise way out of the mug, so don't be alarmed! Allow to cool, and enjoy :)!

Wednesday, September 25, 2013

Sandwich buns

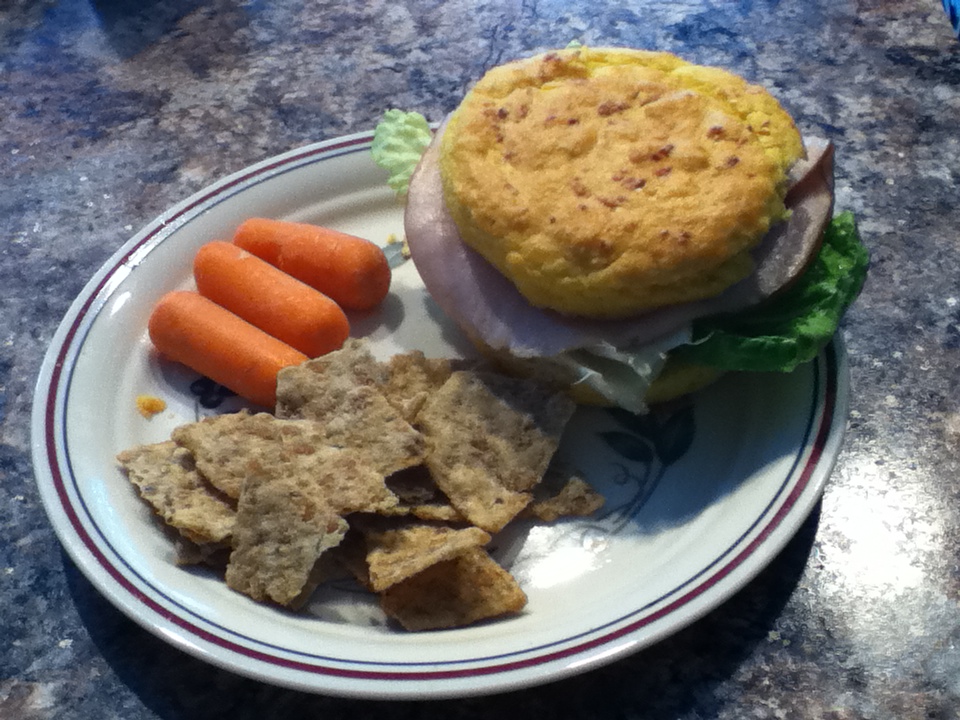
Bread recipes are always hard for me, as I don't like to use yeast. I have been experimenting, trying to come up with new recipes for breads. My new favorite is a sandwich recipe for one. You can double or triple the recipe if you want. I like to make them custom for each family member. I have a similar recipe in my cookbook, but this one is a tad different. If you can't have almonds, you could replace with another gluten free flour. I am including some variations to the recipe as well.

The base for the recipe are these ingredients:
4 Tablespoons almond flour
1 egg
1 tsp. baking powder

For an herb bread:
Add 1/8 tsp. salt, 1/8 tsp. garlic powder and 1-2 tsp. of dried minced onions.
If cheese is permitted, add 1 Tablespoon of parmesan cheese. If not, just leave it out. It is still yummy. My hubby gets to eat it this way, the lucky guy.

For sweet bread (my daughter's favorite way to eat it):
Add a pinch of salt, 1/4-1/2 tsp. cinnamon, and whatever sweetener you prefer. I usually add a squirt of liquid stevia (probably 1/4 tsp. worth), or 2 packets of stevia powder.

Bake in a greased ramekin dish at 350 degrees for 15 minutes. I use my toaster oven for this, and it works great.


Sunday, September 1, 2013

September Flexi of the Month


Flitter into Fall with the fascinating dragonfly alive with refreshing shades of vibrant greens and gold and finding rest on the lavish arrangement of shimmering glass and crystal. She alights this brilliant gold September FOTM for just a short time while supplies last.

To view the sizes and prices, please visit my website at http://www.lillarose.biz/livinglifescentsibly/ 

Thursday, August 29, 2013

Exciting things happening!

Another adventure I am starting on is that I recently became a Lilla Rose hair clip consultant. I have used the Flexi-8 clips for years, and Lilla Rose is just an extension of that. The clips are super beautiful...

They also come in several sizes and gorgeous styles. Besides the fact that they are super beautiful, I love that they don't harm the hair. Normally, I have to wrap string around the base of my store bought barrettes because the clip part is sharp enough to slice through the hair. The Flexi's are notched with 3 notches in the stick to make the clip tighter or looser as you put it in. They are called "flexi" because the actually barrette part will bend to go around a style comfortably. Plus, I have to say that these gorgeous hair bling items are much prettier than a scrunchie :). To visit my page, please click on the Lilla Rose link in the page list at the top of my blog!

Thursday, July 4, 2013

Happy 4th of July!

We are having family over, and we are grilling steaks as the main course. I also made one of my favorite recipes...Tabouleh. For those of you who have no idea what Tabouleh is, it is a cold salad usually made with bulgar wheat, vegetables and spices. Since bulgar is a grain that contains gluten, I substitute quinoa for the bulgar. Most Tabouleh recipes call for mint and parsley. I make mine a little different, and love how it tastes. I forgot to add the black olives when I made the batch this time. So they are not in the picture. Here is my recipe:

2 cups dry quinoa
2 cucumbers, peeled, seeded and chopped
2 large tomatoes, or 4 Roma tomatoes, seeded and chopped
3 Tablespoons dried minced onion
1/2 cup chopped cilantro
1 small can sliced black olives
3/4 cup olive oil
juice of 2 large lemons, or 3 small lemons
2 1/2 tsp. salt, or to taste

If possible, soak the quinoa in warm water with 2 tsp. of lemon juice overnight. This helps make the quinoa easier to digest. This step is not necessary, just helpful for those with digestive problems. If you soak the quinoa overnight, drain and rinse before cooking. If you do not soak the quinoa, make sure to rinse it well before you cook it. Place the quinoa in a large pan, and add 4 cups of water. Bring quinoa to a boil, then turn the heat down to simmer. Cover with a lid, and cook for 20 minutes, or until quinoa is cooked through and the water is gone. Remove from heat and allow quinoa to cool.

Once quinoa is cooled, add the cucumbers, tomatoes, dried onions, cilantro and black olives in a large bowl. In a separate bowl, mix the olive oil, lemon juice and salt. Add to the quinoa mixture and mix well. Refrigerate for at least 1 hour to allow flavors to marinate.

**This recipe makes a very large amount. Recipe can be cut in half.

Besides the quinoa Tabouleh, I made a festive 4th of July fruit bars that are gluten and dairy free. The recipe for it is here: http://glutenfreefix.com/festive-fruit-bars/2506/ . I thought the bars turned out really pretty :). I can't wait to see how they taste! I hope you all have a wonderful 4th of July!


Wednesday, June 5, 2013

Grain Free Carrot Cake


1/3 c. coconut oil
1/4 c. honey
3/4 c. applesauce
3/4 tsp. liquid stevia (I used the NOW stevia glycerite)
2 eggs
2/3 c. almond flour
1/3 c. coconut flour
1/2 tsp. baking powder
1/2 tsp. baking soda
1/4 tsp. salt
1 tsp. cinnamon
1 c. finely chopped or grated carrots

In a bowl, cream coconut oil, honey, applesauce, stevia and eggs together. Mix dry ingredients in a separate bowl, then add to the creamed mixture. Fold in carrots. Press into an 8 x 8 greased baking pan. Bake at 350 degrees for 30 minutes, or until tests done.

The frosting recipe I used is here. I didn't add the lemon in the recipe, but you could leave it in if you wanted.

Sunday, May 19, 2013

Gluten-Free Casein-Free Chocolate Chip Cookies


My daughter had a party with our church group yesterday, and they were having cookies and popcorn. I always want to make sure she has tasty food to bring, so she won't feel left out. The popcorn part was easy, but cookies are always a bit more challenging, especially when we try to do low sugar. I adapted this recipe from a Toll House recipe. They were a hit!

1 c. shortening (I used Spectrum Naturals, which is non-hydrogenated palm oil)
1/2 cup xylitol
1/2 cup packed coconut sugar
1/8 tsp. stevia (you probably don't need it, but I used very low sugar chocolate)
1 tsp. vanilla
2 eggs
1 1/2 cup gluten free flour blend (3/4 c. rice flour, 1/2 c. potato starch, 1/4 c. tapioca starch)
3/4 cup almond flour (you can replace it with the gluten free flour blend if you have a nut allergy)
1 1/2 tsp. xanthan gum
1 tsp. salt
1 tsp. baking powder
1 tsp. baking soda
1/2-1 cup chocolate chips (I used a dark chocolate very low sugar bar and broke it into pieces)

Cream the shortening, xylitol, coconut sugar, stevia, and vanilla. Add eggs and blend well. Mix the dry ingredients together in a bowl, and slowly add to the creamed ingredients. Fold in chocolate chips/pieces.

Drop dough onto ungreased cookie sheets by spoonfuls, flattening the dough a bit with the back of the spoon. Bake at 350 degrees for 12 minutes, or until golden brown. Remove immediately from the cookie sheet to cool on wire racks.

Note: Because of the almond flour in this recipe, I store the cookies in the fridge. This recipe made 2 dozen cookies when I made them.

Saturday, May 18, 2013

Chocolate No-Bake Bars


1/4 cup cocoa
1/8 tsp. stevia --or more, depending on what kind you use. I used the pure Nunaturals stevia for this recipe today. I think I like the liquid NOW stevia glycerite better for this. I used about 1/2 ts...p. of the liquid last time I made these
1/2 cup honey (if you don't like stevia or honey, you can replace with about 2 cups of sugar)

1/4 cup xylitol (or honey)
1/2 cup coconut oil
3/4 cup non dairy milk
1/2 cup peanut butter
1 tsp. vanilla
3 cups gluten free rolled oats

Place all ingredients minus the vanilla and oats in a large saucepan. Melt and stir the ingredients over medium/high heat until melted and bubbly. Take off the heat and add the vanilla and oats. Spread into a greased 8 x 8 pan. Refrigerate until hardened. Keep refrigerated.

Wednesday, May 1, 2013

Mini Chicken Pot Pies


1 cup gluten free flour (I used garbanzo)
1 tsp. salt
4 tsp. baking powder
2 T. o...il
1 c. milk
4 eggs
1 tsp. basil
1 tsp. garlic
Veggies of choice like carrots, peas, onions, etc.
Chicken or whatever meat you want **
Daiya cheese (optional)

Preheat oven to 350 degrees. Mix the first 8 ingredients in a bowl. In a sprayed muffin pan, add 1 tablespoon of the mix into each muffin cup. Add veggies, meat and cheese. Top with another 1-2 tablespoons (depending on how much room you have left) mix. Bake for 30-40 minutes, or until they test done. Remove immediated from pan onto wire rack. Serve warm.

**I haven't tried this idea yet, but I would think you could make a pizza type mini pie. You could use veggies like onions, green peppers, black olives, etc., and use pepperoni or sausage as the meat. Then you could top it or serve it with pizza sauce.

Tuesday, April 16, 2013

Kopy Kat Kit Kat Bars

These are a bit of work, but so worth it!!

Wafer:
4 egg whites (room temperature)
1 ½ tsp. vanilla
¼ tsp. xanthan gum
½ tsp. liquid stevia (replace with 1 cup sugar if you do not like stevia)
3 T. honey
Place egg whites, vanilla and xanthan gum in a mixing bowl*. Start beating and drizzle in stevia and honey. If you are adding sugar in place of stevia, add it slowly, a little bit at a time. Beat for 10 minutes or until stiff peaks form. Place mixture in a Ziplock bag and snip a corner with scissors. Squeeze out long rectangle shapes onto parchment paper-lined baking sheets. Bake at 300° for 40 minutes. Watch carefully so that they do not burn. If they start getting too brown, drop temperature down to 275°. After 40 minutes, turn heat down to 200° for another 30 minutes. Turn off heat and open the oven door. Allow to cool with the oven door open for 1 hour.

Chocolate coating:
4 oz. unsweetened bakers chocolate (I used Sunspire baking chocolate)
½ tsp. liquid stevia (replace with ½ cup sugar if you do not like stevia)
¼ cup honey
¼ cup coconut oil

Melt coating ingredients over low heat, stirring constantly until melted. Allow to cool slightly. Dip wafers in the coating, and place back on the parchment paper. Place in the refrigerator until hardened. Store bars in the refrigerator.

*I used a stand mixer for this recipe. I found a Sunbeam stand mixer at amazon.com for under $40.00. For recipes like this, it makes it so much less time consuming.

Monday, March 25, 2013

Making homemade, dairy-free ice cream


For those of you who do not have a high powered blender like a Vitamix, and want to make dairy free ice cream, I found an easy way. It does require an immersion/stick blender, which can be purchased at Amazon and other places for under $15.... I found mine at Goodwill for $2. Garage sales are a great place to find them as well. For making easy ice cream, take frozen fruit (I have used bananas, mangos, strawberries, etc.) and place it the fruit in a ziplock type bag. Pound the fruit with a hammer (I used the flat side of a meat tenderizer) until flattened. Place in a tall bowl (so it doesn't splatter out). Add some milk, and blend with the stick blender until creamy. Add more milk as needed to get to desired consistency. Sweeten with stevia or your favorite sweetener. This will also work for frozen milk cubes, like the mint chip ice cream recipe from St. Patricks Day that I posted. Just put the frozen cubes in a bag and pound them, and use the stick blender to blend. For vanilla ice cream, freeze dairy free milk in ice cube trays. When cubes are frozen, pop out of tray and store in ziplocks in the freezer. When you are ready to make the vanilla ice cream, add vanilla and sweetener after smashing cubes and blending with stick blender. From what I have read, store-bought almond milk isn't supposed to be frozen (I'm not sure why). I haven't tried it to see how it would work. I used homemade almond milk or coconut milk for these recipes.

Sunday, March 17, 2013

Dairy-Free Mint Chip Ice Cream

One of my favorite ice cream's growing up was Mint Chocolate Chip. I can't tell you the last time I ate the real version because of the dairy, sugar and food coloring. I did make a healthy dairy-free

3 cups coconut milk (or another non-dairy milk)
1/2 cup fresh spinach -- I actually use...d mixed greens and took all the red and purple pieces out. You can also use 1/8 cup frozen spinach. You can't taste the spinach or greens, it is just for color.
2-3 drops food grade peppermint oil (I used Young Living)
Stevia to taste (or whatever sweetener you prefer)
Chocolate chips (I used homemade chocolate and broke it up into pieces)

Blend the milk, spinach, peppermint oil and sweetener in a blender until smooth. Pour into ice cube trays or a shallow container. Freeze. Once frozen, pop the frozen milk cubes out and put them in a blender. I used a Vitamix for this, so if you use a regular blender or food processor, you may have to let the cubes thaw a bit. Blend until smooth, then mix in the chocolate pieces.


By the way...the picture of the finished product is not mine. It wasn't until we gobbled it up that I realized I should have taken a picture . It looked very similar to the picture.