Monday, December 23, 2013

Candy Cane Kisses

As Christmas is almost upon us, I am trying to create as many healthy goodies as I can. My newest creation is Candy Cane Kisses. These are just SO yummy! I was so happy that they turned out great the first try. Love when that happens :)! They are very addictive, so make sure you make a lot. They are crispy, not chewy, and are hard to describe what they compare to. They are like small, melt-in-your-mouth crispy cookies. That is all I can describe them as!

Here is the recipe:

4 egg whites, room temperature
1/4 tsp. salt
1/4 tsp. cream of tartar
1/4 cup honey
1/2 tsp. liquid stevia (I used NOW stevia glycerite)
1 tsp. vanilla extract
1 or 2 peppermint crushed candy canes (I only used 1. I used these, which I got at our local co-op. They are corn syrup free, dye free and organic)

In a mixing bowl, beat egg whites until foamy. Add the salt and cream of tartar, and while beating, slowly drizzle in the honey, stevia and vanilla. Beat until stiff and glossy (about 10 minutes). Spoon the meringue mix into a re-sealable plastic bag (you can also use a pastry bag). Cut a small hole in the corner of the re-sealable bag. Squeeze small kisses (I did about 1 1/2 inch sizes) onto parchment or Silpat lined baking sheets. Sprinkle the kisses with the crushed candy canes. Bake at 225 degrees for 1 1/2 hours. If they start getting too browned, turn the heat down farther. They will still be soft after cooking. Turn oven off, and allow the kisses to cool in the oven for at least an hour. After cooled and hardened, remove them from the baking sheets and store in an airtight container.

This recipe made a little over 100 kisses. I made them last night, and they are already halfway gone, so I need to make more before Christmas.

Wednesday, December 18, 2013

Flexi's for sale


I have 5 December Flexi of the Months available for sale, if anyone is interested. They are sold out on the website. If you would like it before Christmas, there may be enough time to do that if you get one quick enough. I am going to give a discount price also on each Flexi. The sizes I have, with the prices (minus shipping) are:

1 Extra Small - $15 (normally $16)
2 Small - $16 each (normally $17)
 1 Medium - $19 (normally $20)
1 Large - $20 (normally $21)

Monday, November 25, 2013

December FOTM


Lilla Rose released the December FOTM a bit early, so that people could get it before Christmas. It is beautiful!! Supplies are very limited, so get them while you can! I purchased extra ones, so if they run out, you can contact me if you are interested in purchasing one.

Friday, November 1, 2013

November Flexi of the Month

The November Flexi of the Month is now available for purchase! For information, please visit my Lilla Rose page here !


Tuesday, October 8, 2013

Mug cake

I had written before about the fact that my daughter showed up as positive to being allergic to eggs. We went egg free for awhile, but didn't see any changes positively or negatively. We consulted with our doctor, who recommended we try eggs again and see what happens. So far everything has been fine, so I am really thankful for that! I really feel for those of you who have egg allergies. It makes baking so much harder!

I have been trying to perfect a mug cake that my daughter will eat. I make a chocolate one for my hubby, and he loves it. My daughter isn't a huge chocolate fan. I made this the other day, and my daughter said it tasted like a cross between cake and a muffin. It was a hit! Yay! It is very easy, and quick to make. If you have trouble with the nut flour/butter, you can try substituting with another gluten free flour and omitting the nut butter (add an extra tablespoon of gluten free flour). You may need to add a bit of milk if you substitute the flour.

1 Tablespoon ghee
1 Tablespoon nut butter (I used almond butter)
2 Tablespoons almond flour
1/2 tsp. baking powder
1 egg
Stevia or honey to taste (I taste the batter before I put it in the microwave to cook)
1/2 tsp. (or more) vanilla extract

Melt the ghee and nut butter in a coffee mug in the microwave. Add the remaining ingredients and stir very well (this is important because otherwise you will have chunks of cooked egg in your cake). Taste to see if it is sweet enough. Place the mug in the microwave and cook for 1 minute 15 seconds (or longer if your microwave is not very powerful). The cake will rise way out of the mug, so don't be alarmed! Allow to cool, and enjoy :)!

Wednesday, September 25, 2013

Sandwich buns

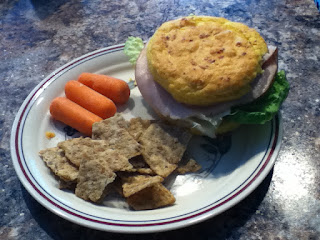
Bread recipes are always hard for me, as I don't like to use yeast. I have been experimenting, trying to come up with new recipes for breads. My new favorite is a sandwich recipe for one. You can double or triple the recipe if you want. I like to make them custom for each family member. I have a similar recipe in my cookbook, but this one is a tad different. If you can't have almonds, you could replace with another gluten free flour. I am including some variations to the recipe as well.

The base for the recipe are these ingredients:
4 Tablespoons almond flour
1 egg
1 tsp. baking powder

For an herb bread:
Add 1/8 tsp. salt, 1/8 tsp. garlic powder and 1-2 tsp. of dried minced onions.
If cheese is permitted, add 1 Tablespoon of parmesan cheese. If not, just leave it out. It is still yummy. My hubby gets to eat it this way, the lucky guy.

For sweet bread (my daughter's favorite way to eat it):
Add a pinch of salt, 1/4-1/2 tsp. cinnamon, and whatever sweetener you prefer. I usually add a squirt of liquid stevia (probably 1/4 tsp. worth), or 2 packets of stevia powder.

Bake in a greased ramekin dish at 350 degrees for 15 minutes. I use my toaster oven for this, and it works great.


Sunday, September 1, 2013

September Flexi of the Month


Flitter into Fall with the fascinating dragonfly alive with refreshing shades of vibrant greens and gold and finding rest on the lavish arrangement of shimmering glass and crystal. She alights this brilliant gold September FOTM for just a short time while supplies last.

To view the sizes and prices, please visit my website at http://www.lillarose.biz/livinglifescentsibly/ 

Thursday, August 29, 2013

Exciting things happening!

Another adventure I am starting on is that I recently became a Lilla Rose hair clip consultant. I have used the Flexi-8 clips for years, and Lilla Rose is just an extension of that. The clips are super beautiful...

They also come in several sizes and gorgeous styles. Besides the fact that they are super beautiful, I love that they don't harm the hair. Normally, I have to wrap string around the base of my store bought barrettes because the clip part is sharp enough to slice through the hair. The Flexi's are notched with 3 notches in the stick to make the clip tighter or looser as you put it in. They are called "flexi" because the actually barrette part will bend to go around a style comfortably. Plus, I have to say that these gorgeous hair bling items are much prettier than a scrunchie :). To visit my page, please click on the Lilla Rose link in the page list at the top of my blog!

Thursday, July 4, 2013

Happy 4th of July!

We are having family over, and we are grilling steaks as the main course. I also made one of my favorite recipes...Tabouleh. For those of you who have no idea what Tabouleh is, it is a cold salad usually made with bulgar wheat, vegetables and spices. Since bulgar is a grain that contains gluten, I substitute quinoa for the bulgar. Most Tabouleh recipes call for mint and parsley. I make mine a little different, and love how it tastes. I forgot to add the black olives when I made the batch this time. So they are not in the picture. Here is my recipe:

2 cups dry quinoa
2 cucumbers, peeled, seeded and chopped
2 large tomatoes, or 4 Roma tomatoes, seeded and chopped
3 Tablespoons dried minced onion
1/2 cup chopped cilantro
1 small can sliced black olives
3/4 cup olive oil
juice of 2 large lemons, or 3 small lemons
2 1/2 tsp. salt, or to taste

If possible, soak the quinoa in warm water with 2 tsp. of lemon juice overnight. This helps make the quinoa easier to digest. This step is not necessary, just helpful for those with digestive problems. If you soak the quinoa overnight, drain and rinse before cooking. If you do not soak the quinoa, make sure to rinse it well before you cook it. Place the quinoa in a large pan, and add 4 cups of water. Bring quinoa to a boil, then turn the heat down to simmer. Cover with a lid, and cook for 20 minutes, or until quinoa is cooked through and the water is gone. Remove from heat and allow quinoa to cool.

Once quinoa is cooled, add the cucumbers, tomatoes, dried onions, cilantro and black olives in a large bowl. In a separate bowl, mix the olive oil, lemon juice and salt. Add to the quinoa mixture and mix well. Refrigerate for at least 1 hour to allow flavors to marinate.

**This recipe makes a very large amount. Recipe can be cut in half.

Besides the quinoa Tabouleh, I made a festive 4th of July fruit bars that are gluten and dairy free. The recipe for it is here: http://glutenfreefix.com/festive-fruit-bars/2506/ . I thought the bars turned out really pretty :). I can't wait to see how they taste! I hope you all have a wonderful 4th of July!


Wednesday, June 5, 2013

Grain Free Carrot Cake


1/3 c. coconut oil
1/4 c. honey
3/4 c. applesauce
3/4 tsp. liquid stevia (I used the NOW stevia glycerite)
2 eggs
2/3 c. almond flour
1/3 c. coconut flour
1/2 tsp. baking powder
1/2 tsp. baking soda
1/4 tsp. salt
1 tsp. cinnamon
1 c. finely chopped or grated carrots

In a bowl, cream coconut oil, honey, applesauce, stevia and eggs together. Mix dry ingredients in a separate bowl, then add to the creamed mixture. Fold in carrots. Press into an 8 x 8 greased baking pan. Bake at 350 degrees for 30 minutes, or until tests done.

The frosting recipe I used is here. I didn't add the lemon in the recipe, but you could leave it in if you wanted.

Sunday, May 19, 2013

Gluten-Free Casein-Free Chocolate Chip Cookies


My daughter had a party with our church group yesterday, and they were having cookies and popcorn. I always want to make sure she has tasty food to bring, so she won't feel left out. The popcorn part was easy, but cookies are always a bit more challenging, especially when we try to do low sugar. I adapted this recipe from a Toll House recipe. They were a hit!

1 c. shortening (I used Spectrum Naturals, which is non-hydrogenated palm oil)
1/2 cup xylitol
1/2 cup packed coconut sugar
1/8 tsp. stevia (you probably don't need it, but I used very low sugar chocolate)
1 tsp. vanilla
2 eggs
1 1/2 cup gluten free flour blend (3/4 c. rice flour, 1/2 c. potato starch, 1/4 c. tapioca starch)
3/4 cup almond flour (you can replace it with the gluten free flour blend if you have a nut allergy)
1 1/2 tsp. xanthan gum
1 tsp. salt
1 tsp. baking powder
1 tsp. baking soda
1/2-1 cup chocolate chips (I used a dark chocolate very low sugar bar and broke it into pieces)

Cream the shortening, xylitol, coconut sugar, stevia, and vanilla. Add eggs and blend well. Mix the dry ingredients together in a bowl, and slowly add to the creamed ingredients. Fold in chocolate chips/pieces.

Drop dough onto ungreased cookie sheets by spoonfuls, flattening the dough a bit with the back of the spoon. Bake at 350 degrees for 12 minutes, or until golden brown. Remove immediately from the cookie sheet to cool on wire racks.

Note: Because of the almond flour in this recipe, I store the cookies in the fridge. This recipe made 2 dozen cookies when I made them.

Saturday, May 18, 2013

Chocolate No-Bake Bars


1/4 cup cocoa
1/8 tsp. stevia --or more, depending on what kind you use. I used the pure Nunaturals stevia for this recipe today. I think I like the liquid NOW stevia glycerite better for this. I used about 1/2 ts...p. of the liquid last time I made these
1/2 cup honey (if you don't like stevia or honey, you can replace with about 2 cups of sugar)

1/4 cup xylitol (or honey)
1/2 cup coconut oil
3/4 cup non dairy milk
1/2 cup peanut butter
1 tsp. vanilla
3 cups gluten free rolled oats

Place all ingredients minus the vanilla and oats in a large saucepan. Melt and stir the ingredients over medium/high heat until melted and bubbly. Take off the heat and add the vanilla and oats. Spread into a greased 8 x 8 pan. Refrigerate until hardened. Keep refrigerated.

Wednesday, May 1, 2013

Mini Chicken Pot Pies


1 cup gluten free flour (I used garbanzo)
1 tsp. salt
4 tsp. baking powder
2 T. o...il
1 c. milk
4 eggs
1 tsp. basil
1 tsp. garlic
Veggies of choice like carrots, peas, onions, etc.
Chicken or whatever meat you want **
Daiya cheese (optional)

Preheat oven to 350 degrees. Mix the first 8 ingredients in a bowl. In a sprayed muffin pan, add 1 tablespoon of the mix into each muffin cup. Add veggies, meat and cheese. Top with another 1-2 tablespoons (depending on how much room you have left) mix. Bake for 30-40 minutes, or until they test done. Remove immediated from pan onto wire rack. Serve warm.

**I haven't tried this idea yet, but I would think you could make a pizza type mini pie. You could use veggies like onions, green peppers, black olives, etc., and use pepperoni or sausage as the meat. Then you could top it or serve it with pizza sauce.

Tuesday, April 16, 2013

Kopy Kat Kit Kat Bars

These are a bit of work, but so worth it!!

Wafer:
4 egg whites (room temperature)
1 ½ tsp. vanilla
¼ tsp. xanthan gum
½ tsp. liquid stevia (replace with 1 cup sugar if you do not like stevia)
3 T. honey
Place egg whites, vanilla and xanthan gum in a mixing bowl*. Start beating and drizzle in stevia and honey. If you are adding sugar in place of stevia, add it slowly, a little bit at a time. Beat for 10 minutes or until stiff peaks form. Place mixture in a Ziplock bag and snip a corner with scissors. Squeeze out long rectangle shapes onto parchment paper-lined baking sheets. Bake at 300° for 40 minutes. Watch carefully so that they do not burn. If they start getting too brown, drop temperature down to 275°. After 40 minutes, turn heat down to 200° for another 30 minutes. Turn off heat and open the oven door. Allow to cool with the oven door open for 1 hour.

Chocolate coating:
4 oz. unsweetened bakers chocolate (I used Sunspire baking chocolate)
½ tsp. liquid stevia (replace with ½ cup sugar if you do not like stevia)
¼ cup honey
¼ cup coconut oil

Melt coating ingredients over low heat, stirring constantly until melted. Allow to cool slightly. Dip wafers in the coating, and place back on the parchment paper. Place in the refrigerator until hardened. Store bars in the refrigerator.

*I used a stand mixer for this recipe. I found a Sunbeam stand mixer at amazon.com for under $40.00. For recipes like this, it makes it so much less time consuming.

Monday, March 25, 2013

Making homemade, dairy-free ice cream


For those of you who do not have a high powered blender like a Vitamix, and want to make dairy free ice cream, I found an easy way. It does require an immersion/stick blender, which can be purchased at Amazon and other places for under $15.... I found mine at Goodwill for $2. Garage sales are a great place to find them as well. For making easy ice cream, take frozen fruit (I have used bananas, mangos, strawberries, etc.) and place it the fruit in a ziplock type bag. Pound the fruit with a hammer (I used the flat side of a meat tenderizer) until flattened. Place in a tall bowl (so it doesn't splatter out). Add some milk, and blend with the stick blender until creamy. Add more milk as needed to get to desired consistency. Sweeten with stevia or your favorite sweetener. This will also work for frozen milk cubes, like the mint chip ice cream recipe from St. Patricks Day that I posted. Just put the frozen cubes in a bag and pound them, and use the stick blender to blend. For vanilla ice cream, freeze dairy free milk in ice cube trays. When cubes are frozen, pop out of tray and store in ziplocks in the freezer. When you are ready to make the vanilla ice cream, add vanilla and sweetener after smashing cubes and blending with stick blender. From what I have read, store-bought almond milk isn't supposed to be frozen (I'm not sure why). I haven't tried it to see how it would work. I used homemade almond milk or coconut milk for these recipes.

Sunday, March 17, 2013

Dairy-Free Mint Chip Ice Cream

One of my favorite ice cream's growing up was Mint Chocolate Chip. I can't tell you the last time I ate the real version because of the dairy, sugar and food coloring. I did make a healthy dairy-free

3 cups coconut milk (or another non-dairy milk)
1/2 cup fresh spinach -- I actually use...d mixed greens and took all the red and purple pieces out. You can also use 1/8 cup frozen spinach. You can't taste the spinach or greens, it is just for color.
2-3 drops food grade peppermint oil (I used Young Living)
Stevia to taste (or whatever sweetener you prefer)
Chocolate chips (I used homemade chocolate and broke it up into pieces)

Blend the milk, spinach, peppermint oil and sweetener in a blender until smooth. Pour into ice cube trays or a shallow container. Freeze. Once frozen, pop the frozen milk cubes out and put them in a blender. I used a Vitamix for this, so if you use a regular blender or food processor, you may have to let the cubes thaw a bit. Blend until smooth, then mix in the chocolate pieces.


By the way...the picture of the finished product is not mine. It wasn't until we gobbled it up that I realized I should have taken a picture . It looked very similar to the picture.

Monday, January 14, 2013

Pumpkin Custard

I was having a sweet tooth again today (what's new!) for something with pumpkin. I threw this together, and actually wrote down what I did. I'm getting better at that :).

Pumpkin Custard
1 15 ounce can pumpkin
1 cup milk (I used flax seed milk...hubby just bought it to try)
4 eggs
1/4 tsp. nutmeg
1 tsp. cinnamon
1/2 tsp. liquid stevia (you can replace with extra sugar if you don't like stevia)
1/2 tsp. vanilla
1/4 - 1/2 cup honey (or more if you like it really sweet)

Preheat oven to 325 degrees. Grease either small custard cups or a casserole type dish. In a double boiler, add all ingredients and whisk well to mix. Heat until the ingredients reach 150 degrees (use a candy thermometer). Pour into the small custard cups or in the casserole dish. Put the cups or the dish in a larger pan, and fill the pan 1 inch full of hot water. Be careful not to spill any water into the custard. Bake for 55-60 minutes, or until the custard tests done.

Friday, January 11, 2013

Grain free easy tortillas/wraps

I am not one who likes to roll out things. Rolling play dough out with my daughter is fun. Rolling pie crust...not so much. Pie crusts and homemade tortillas always took forever because of all the rolling. When I went gluten free, rolling things out got downright frustrating at times. Gluten free grains can get really crumbly and fall apart easily. I can't tell you how many pie crusts I have ruined after I rolled them out and tried to put them in the plate. I started concocting pressable pie crust recipes because of my dislike for rolling pie crusts. For a long time, I looked for a gluten free/corn free tortilla recipe that I could pour instead of roll, but couldn't find one. I decided to concoct one of my own (this is how a lot of my recipes get started! lol!). I had been making mini pizza crusts for years with an old recipe I modified, but never tried it for tortillas. This recipe is easy, and doesn't require any rolling! Yay! Basically, what we are making is seasoned crepes. Here is the recipe:

1 cup arrowroot powder (or cornstarch if you don't have arrowroot)
1 cup tapioca starch
2 tsp. salt
2 Tbsp. Italian Seasoning (sounds like a lot, but gives it amazing flavor)
1 tsp. garlic powder
1 tsp. onion powder
1 1/2 cups dairy free milk (or regular milk, if dairy isn't an issue)
4 eggs

Mix all ingredients together in a bowl, making sure it is free of lumps. You can make these in a non-stick skillet, or you can do them on an electric skillet. I used an electric skillet because I could make more than one at once. Pour a small pancake size amount onto your skillet.

If using an electric skillet, spread the batter out with a spatula, making a large crepe.
 They should look like the picture below, and be almost see through. If using a regular skillet, as you pour the batter, pick up the skillet and move it so that the batter spreads around the pan.
 Cook like a pancake, and flip when ready. Cool on a wire rack so that they don't stick together. The finished wrap looks like this:
They look super flimsy don't they? I was shocked that they held together better than any tortilla I have ever tried! Normally, when I make tacos and stuff a regular tortilla full, it falls apart. This one doesn't do that! I use them for tortillas and wraps. They make a great lunch stuffed with lunchmeat and veggies. I like to cut the tortillas into wedges and bake them in the oven and make tortilla chips. They taste wonderful with salsa, or made into nachos. This recipe can be used to make small pancake size mini pizza crusts. Just pour the batter, but don't spread it out, and cook it like a pancake. Then add pizza sauce to them and toppings and bake in the oven. A quick and easy lunch!

This recipe makes about 14 large wraps. I like to freeze them in layers between wax paper, and pull them out when I need them. To reheat them, place them in a toaster oven or regular oven on the rack and heat until warm. Don't heat too long or they will get crisp. I have never tried to thaw these in the microwave. I think they would get mushy, but maybe not. You could also double the recipe, or half the recipe.

***Note: if you make these in a non-stick skillet, do not use oil, as they make the tortillas gummy. Non-stick cooking spray would probably work fine, but test first to make sure the spray doesn't make the tortillas gummy.

Thursday, January 10, 2013

Making your own broth/stock

I go through chicken and beef broth quickly. I used to buy it from the store, but most contain additives, and some contain hidden gluten or soy. I started reading The Maker's Diet a long time ago, and started making my own broths/stocks. I do a large amount at once, then freeze it all in small portions. There is a reason why your Mom used to feed you chicken noodle soup when you were sick as a kid. It wasn't the noodles that made you well, it was the broth! Homemade broth can help build your immune system. It also aids digestion. A good broth will congeal or gel when it cools because of the gelatin that is in the broth. The gelatin is found in animal cartilage and connective tissue. The more gelatin there is in the broth, the healthier it is for the body.

When I make chicken stock/broth, I use chicken necks and backs. You can get necks and backs fairly cheap from a butcher because they are considered the "throw away" parts. We butcher our own free-range chickens, so we package the necks and backs separately. I also use one other ingredient that took me awhile to get used to...chicken feet! In his book, The Maker's Diet, Jordan Rubin wrote that Jewish people have used chicken feet in their broth for centuries, and broth made with it is sometimes called "Jewish penicillin". Chicken feet can also be purchased inexpensively at a butcher shop. The first time I ever used chicken feet in my broth, I was amazed at how much more gelatin the broth had. I have to say that it was a little freaky at first. I felt like some mad scientist boiling body parts :).

I have a huge pot of stock on the stove right now. Along with the chicken, I put in some largely chopped up carrots, celery, and onion, and celtic salt. You can also add garlic and other veggies. This picture was taken about an hour after I started cooking it.

 And here are the freaky feet! There are even claws on the end of the fingers. Yep, creepy. But you wouldn't believe the gelatin!
 I love making broth in the winter because after I am finished cooking the broth all day, I stick my stock pot outside on the back deck to allow it to cool. With it being only about 30 degrees outside, it works well! After it is cooled, I put a large, fine mesh strainer over a bowl with a pour spout. I use a large ladel or cup with handle and strain the broth mixture through the strainer to remove any bones or chicken pieces. I keep any chicken I get out of the pot and use it later for casseroles. I save my old Trader Joes almond butter glass jars, and fill them 3/4 full with the broth. They are super strong, and don't break easily.
You want to use glass, not plastic, so that the plastic will not leech into your food. You can use any jar. I have had trouble with quart jars breaking when I put them in the freezer, so I use the 16 ounce almond butter jars, or my 13 ounce ghee jars. After you fill the jars, place the lid gently on top without screwing on. This will allow for expansion, and keep the jar from breaking if the broth expands too much. Put in the freezer. After the broth is completely frozen, close the jars. To use the broth, I put the frozen jars in cold water for a few minutes. Then I replace the water with warmer water, and work my way up to hot water. I tend to not be very patient with this part, and usually end up whacking at it with a knife to get the chunks out. You can also microwave it. With my huge stock pot, I should end up with about 30 jars of broth. If you don't have freezer room for that, you can make it in smaller amounts. Once you try homemade stock, you will never want to go back to the store-bought stuff!

Wednesday, January 9, 2013

Homemade coconut milk

I have been using carton and canned coconut milk for a long time. The carton milk is usually a bit cheaper than the canned, but it is still around $3.00 a quart. I have found it for $4.85 for a 1/2 gallon, but I have to drive a long ways to get it for that price. I have known for awhile that the carton and canned milks have additives. I'm not a fan of additives because they are usually harmful to the body. In researching the non-dairy milks recently, it seems that they all contain two possibly harmful additives. Carrageenan and guar gum, which are thickeners/emulsifiers that come from seaweed, sound harmless. The problem is that they are notorious for causing pain, cramping and diarrhea symptoms in people with digestive problems. I ran out of almond and coconut carton milk for several weeks, and had been making my own nut milks for awhile. I noticed a dramatic change for the better in my digestion. I recently added the carton milks back, and the digestive problems came back. Hmmm.

I decided to find out if I could make my own coconut milk. I did some reseach, and voila! It is very doable. What is more interesting is that it is extremely easy to make. I didn't want to make a large amount, so this is my throw together recipe. Every website I looked at seemed to have different recipes, so I just decided to figure it out on my own. Here is what I did for about 10 ounces of coconut milk (most cans are 13 ounces). I used a Vitamix for this, but you could use a regular blender. I put 1/4 cup of shredded coconut in my Vitamix along with 1 1/2 cups of hot (not boiling) water:
 I let it sit for about 45 minutes to cool in the Vitamix. Then I blended it on high for about 1 minute. This is what it looked like after blended:
 I then strained it through a fine mesh strainer. You can also use cheesecloth, but this is less messy. Since it was just a small amount of milk, I used a small strainer. If I make larger batches, I will have to use a large strainer to save time.
 There will be pulp left over in the strainer. I put mine in a glass jar and put it in the freezer. I will add to the jar as I make more milk. When the jar of pulp in the freezer gets full, I can either use it in baking, or I can dehydrate it and make coconut flour! So no waste at all!
 I put the strained milk in a glass canning jar with a lid. It is nice and creamy. I put it in the fridge, and didn't touch it for the rest of the night. I wanted to see if it would mimic the canned coconut milk after putting it in the fridge. The canned coconut milk will separate, leaving a thick layer of cream that can be used to make wonderful recipes.
 This morning, there was about a 1/2 inch layer of cream on the top. Not a whole lot because I didn't use very much coconut. If I had used 1 cup of shredded coconut and 2 cups of water, I think it would have been just like the can (and probably would make about 13 ounces).
 You can see the layer of cream from this angle of the picture.
I stirred the cream into the milk, and tasted it to see what it tasted like. It had almost no flavor, which is perfect for baking. If I had sweetened it and added vanilla, it would have been great for beverages and smoothies. It was about the same consistency as the carton coconut milk, but without the additives, and at a fraction of the cost! I just bought two bags (4.4 pounds total) of shredded organic coconut from Tropical Traditions for $17.00 with free shipping. That will make a lot of coconut milk! I would only be able to buy less than 6 quarts of coconut milk for that. I have the shredded coconut in my Vitamix right now, the the portions being 3/4 cup of coconut to 3 1/2 cups of water. It should make about a quart. For a stronger coconut milk with lots of cream on the top, try 1 cup coconut to 2 cups water. Do the same steps, and put in the fridge after it is made overnight. Let me know if you all try this!!

Tuesday, January 8, 2013

The wonders of ghee

I'm still tweaking my blog, can you tell? I think I have changed the name about 3 times! It is hard to incorporate all the things I would like to do with this blog into a title :). I'll get it the way I want it one of these days!

One of the things I use a lot in dairy free cooking, that I had never even heard of before I went dairy free is ghee. Ghee, for those of you who are as stumped about it as I was, is clarified butter. I'm sure that just cleared it up for you, right? Ghee is actually made from cow's milk. It is an ancient process used mainly by people in India, Pakistan, and areas of Asia. To prepare ghee, butter is melted in a pot over medium heat. The butter begins to melt, forming a white froth on top. It is then simmered and stirred slowly until the color of the butter changes to pale yellow. Then it is cooked on low heat until it turns golden. The residue settles at the bottom and the ghee, which is now clear, golden, translucent and fragrant, is ready. The ghee is then filtered and it solidifies when completely cool. There is your science/cooking lesson for the day. What is amazing is that after all of that, ghee then becomes both lactose and casein free.

 The kind of ghee I buy is from Purity Farms. It looks like butter doesn't it?!

I love it because it not only looks like butter, but it acts like butter. I used it in cookies at Christmas, and it worked amazingly well. I made a powdered sugar frosting for a cake for my dad, and my parents still talk about my frosting. It was the ghee! We use it on our veggies, on toast, on pancakes, on popcorn. Basically anything you would use butter for, we use ghee for. Ghee has a long shelf-life and needs no refrigeration if the jar is sealed tightly. I haven't figured out how long it will last because we use it up pretty quickly. I buy it from either vitacost.com or luckyvitamin.com, as it is much better priced. A 13 ounce jar is about $8.00. I would love to be able to figure out how to make my own, but I'm not sure how cost-effective it would be. I would think you would need a lot of butter to make a small amount of ghee. I may have to look into that!

Sunday, January 6, 2013

Sweet tooth!

I changed my blog around a little. I tend to do more gluten free recipes on a regular basis than I do essential oils recipes. I hope you all (my 2 readers...lol!) enjoy the new changes.

We love sweets in our home. I crave sweets. Thankfully, I don't feel like I need to yank that sweet tooth out anymore because there are so many healthy options! I try to make sweets as healthy as possible for me and my family. Years ago, I started mixing some ingredients together to satisfy my sweet tooth. Here are a few things I make on a regular basis:

Chocolate Balls:
Almond butter or whatever nut butter you prefer
Coconut oil, heated to just melted
Cocoa or carob powder
Honey or xylitol
Stevia

Mix desired amounts together and taste to see if it is sweet enough, and thick enough to form into balls. Scoop into balls and put in fridge. 


 Candy Bars:
1/2 cup cocoa powder or carob powder
1 cup coconut oil, heated just until melted
Honey and stevia to taste
Chopped nuts
1 drop of Peppermint oil (optional)

Mix cocoa, coconut oil and honey and stevia until there are no lumps. Gently stir in chopped nuts and peppermint oil if using. Pour into a parchment lined 8 x 8 pan. Put in the freezer to harden. If using carob powder, these will harden in the refrigerator. These need to be kept in the fridge or freezer, or they will be too soft. They can be chopped up and put into cookies, or melted and used as a chocolate syrup.
 
 
When making these, I actually prefer carob because it tends to be naturally sweeter. My family hates carob, so I make some carob for me and some chocolate for them :).

Tuesday, January 1, 2013

Quinoa Pizza Bites


Happy New Year!! We had a feast of food last night. Homemade quacamole with chips, bbq coctail weiners, a huge salad loaded with yummy fixing, gf chex party mix, maple corn (popcorn recipe from my book), pumpkin bread, gf mexican wedding cakes (the powdered sugar cookies...I need to post that recipe!), and these pizza bites that I modified a recipe for. 
Quinoa Pizza Bites:
2 cups cooked quinoa
2 large eggs
1 cup chopped onion
1 cup Daiya shredded cheese, or regular cheese if you can have dairy
1/2 tsp. garlic powder
2 Tbsp. dried basil (it sounds like a lot, but it adds great flavor)
1 cup choppped pepperoni slices (about 1/2 a 6 ounce bag)
1/2 tsp. seasoned salt (I make my own to avoid food coloring and gluten)
1 tsp. paprika
1 tsp. oregano
Pizza sauce for dipping (I used homemade spaghetti sauce)

Mix together all ingredients except pizza sauce. Fill greased mini muffin tin cups to the top of each cup, pressing down gently to compact. Bake at 350 degrees for 20-25 minutes. Serve with pizza sauce.